Setting the White and Black Point in Lightroom
- Ian Plant
- 8 hours ago
- 3 min read
Setting the white and black points refers to adjusting the brightest and darkest tonal values of a photograph to ensure a full range of tones from pure black to pure white. In the video below, I demonstrate setting your white and black points in Adobe Lightroom. I also discuss when it’s appropriate (or not) to use this technique. Spoiler alert: I actually don't think it is a good idea to always do this!
If you have any trouble watching the video above, you can also watch it here.
How to Set the White and Black Points of an Image
For setting the white point, you need to take the brightest point of your image and shift it so that it is (almost) pure white. You’ll do the opposite for the black point: take the darkest part of your image and set the value at (almost) pure black. The reason I say "almost" is that typically, you don't actually want to lose detail in either your highlights and shadows, although sometimes it is appropriate to do so (and it might also be unavoidable if your raw file already has clipped highlights and/or shadows).
Essentially, what you want to do is stretch the whites and blacks so that they (almost) touch the very edge of the histogram. In the video, I demonstrate stretching the histogram by sliding the Whites and Blacks sliders until I just barely clip my shadows and highlights. Make sure that your shadow and highlight warnings are activated in Lightroom. Then, pull back the sliders until the clipping disappears.
When the histogram is stretched this way, it can enhance the contrast in an image. Setting the white and black points doesn’t mean that your image is now at the proper exposure, though. You still might want to adjust your overall exposure and make other adjustments to contrast, your highlights, or your shadows. Once you have finished other edits to the image, you might need to tweak and reset your white and black points if they have moved while making these other adjustments.
When to Set the White and Black Points
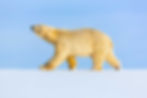
Setting the white and black points is often useful when you want a high-contrast look. The photo below is a good example of a subject that benefits from setting the white and black points. The polar bear was in strong light, and there was some vibrant color present in the scene. Setting the white and black points enhanced the overall contrast and helped make the bear stand out from the blue sky in the background. With photos like this, enhancing contrast by setting the white and black points can often help make colors really pop.
When to Not Set the White and Black Points
For certain scenes or subjects, a low contrast look is better, and setting the white and black points will ruin the effect. Photos taken in heavy fog or during the soft light of twilight are two examples of when I might avoid setting the white and black points. Generally, I'll skip this technique whenever I want a low-contrast look. For example, with the photo below taken in soft light, setting the white and black points would have introduced too much contrast and totally killed the forlorn mood.

In fact—and this may surprise you—I almost never set my white and black points. Instead, I take an individual approach to each image, adjusting the Whites and Blacks sliders to whatever values I think are appropriate for my subject. Sometimes, that means that I stretch my histogram from end to end, but more often than not, it doesn't. Setting the white and black points is just one tool in your creative editing toolkit and should only be reached for when needed. If you set the white and black points of every single photo you process, you're going to end up with some photos that look garishly overcontrasted.


